The E-1 and Lightroom 4 - Experiment #1
I am no Lightroom expert. Even though I've owned it and used it since August 2009 (nearly three years ago), I've used it basically as a Raw converter with the ability to do some minor tweaking. In the right hands Lightroom can produce some remarkable results. Unfortunately my hands aren't that gifted. Perhaps, now that Lightroom 4 has gotten my attention, I'll work to improve my game a bit using this tool.
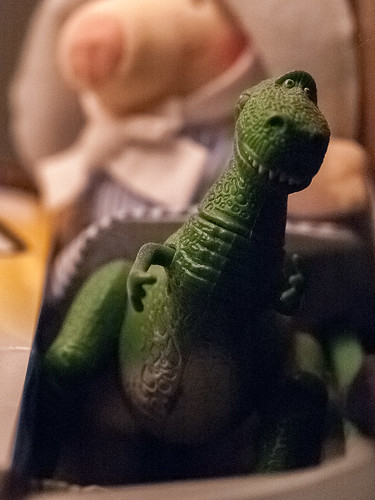
I enabled ISO boost on the E-1 and set ISO to 3200. I then turned the camera on poor old Rex and played a bit with the results. The first image is basically a raw conversion with exposure adjusted +2 to get the histogram back towards the middle. I don't know why the E-1 underexposed as much as it did. Highlights were adjusted -100 to open up detail in the light areas, while whites were adjusted +50 to lighten up the rest of the image. Color noise was adjusted to +100 to remove any color noise, especially in the shadows.
The base image shows the E-1's "limitations" at ISO 3200. Lots of grain and in the broad dark tonal areas what appears to be a bit of vertical banding. Looks bad on screen, not so much in print. But still, what can be done to "improve" the image?
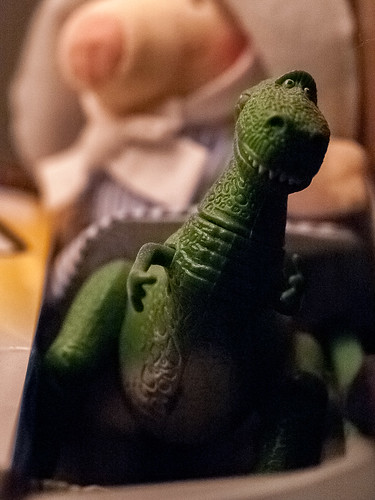
In the past I've used dark clipping to basically drop out the shadowed and dark areas, effectively hiding all details including noise and other artifacts. So I adjusted blacks -25, which darkened the shadow areas and help control noise in the shadows. The lighter areas are essentially untouched.
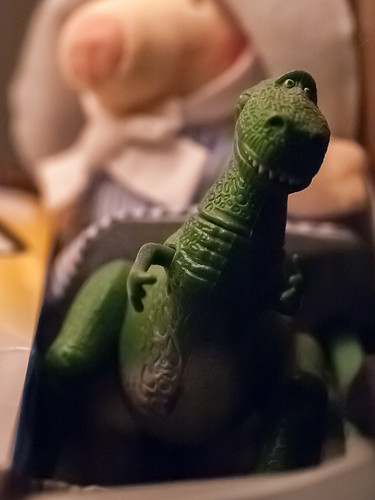
Luminance smoothing is a feature I've not touched in the past. This time as part of the experiment I set the darks back to 0 and then adjusted the luminance smoothing slider from 25 to 75. This pretty much knocked out quite a bit of the noise across all the image (especially in the out-of-focus areas), but in the process de-emphasized fine detail and left a subtle but noticeable saran wrap look across the portions in focus. If you want to know what detail was de-emphasized as an example, there's a small spider web that runs from Rex's unibrow off to the right. You can see it in the first two photos, but a good portion of it is pretty much gone in the last photo.
In this day of $3K+ (body only) über cameras from Canon and Nikon, it's probably worth asking why I would continue to screw around with a nine year old DSLR with a 5MP 4/3rds sized sensor. The answer is cost. I can't afford that kind of camera gear, nor the prior generation that cost in the 'lower and cheaper' mid $2K range. Instead, my budget allows for me to spend $80 for a Lightroom upgrade that brings enhancements and other features to wring more out of the older and definitely lower cost cameras. Yes, I spent a fair amount of money on my current collection; but in all the time I've been buying Olympus and Panasonic equipment, my entire collection's combined cost has yet to reach the cost of a single Canon 5DMk3 body.
I don't think I'm alone in this situation, not by far. Newer equipment will always outperform older equipment. But technique, skill, and a judiciously purchased tool can help close the gap between the generations, helping to extend the useful life of the camera you already own, while keeping your hard-earned money in your pocket where it belongs.
I enabled ISO boost on the E-1 and set ISO to 3200. I then turned the camera on poor old Rex and played a bit with the results. The first image is basically a raw conversion with exposure adjusted +2 to get the histogram back towards the middle. I don't know why the E-1 underexposed as much as it did. Highlights were adjusted -100 to open up detail in the light areas, while whites were adjusted +50 to lighten up the rest of the image. Color noise was adjusted to +100 to remove any color noise, especially in the shadows.
 |
| Base Image |
The base image shows the E-1's "limitations" at ISO 3200. Lots of grain and in the broad dark tonal areas what appears to be a bit of vertical banding. Looks bad on screen, not so much in print. But still, what can be done to "improve" the image?
 |
| Base Image with Blacks -25 |
In the past I've used dark clipping to basically drop out the shadowed and dark areas, effectively hiding all details including noise and other artifacts. So I adjusted blacks -25, which darkened the shadow areas and help control noise in the shadows. The lighter areas are essentially untouched.
 |
| Base Image with Luminance Smoothing +75 |
Luminance smoothing is a feature I've not touched in the past. This time as part of the experiment I set the darks back to 0 and then adjusted the luminance smoothing slider from 25 to 75. This pretty much knocked out quite a bit of the noise across all the image (especially in the out-of-focus areas), but in the process de-emphasized fine detail and left a subtle but noticeable saran wrap look across the portions in focus. If you want to know what detail was de-emphasized as an example, there's a small spider web that runs from Rex's unibrow off to the right. You can see it in the first two photos, but a good portion of it is pretty much gone in the last photo.
In this day of $3K+ (body only) über cameras from Canon and Nikon, it's probably worth asking why I would continue to screw around with a nine year old DSLR with a 5MP 4/3rds sized sensor. The answer is cost. I can't afford that kind of camera gear, nor the prior generation that cost in the 'lower and cheaper' mid $2K range. Instead, my budget allows for me to spend $80 for a Lightroom upgrade that brings enhancements and other features to wring more out of the older and definitely lower cost cameras. Yes, I spent a fair amount of money on my current collection; but in all the time I've been buying Olympus and Panasonic equipment, my entire collection's combined cost has yet to reach the cost of a single Canon 5DMk3 body.
I don't think I'm alone in this situation, not by far. Newer equipment will always outperform older equipment. But technique, skill, and a judiciously purchased tool can help close the gap between the generations, helping to extend the useful life of the camera you already own, while keeping your hard-earned money in your pocket where it belongs.

Comments
Post a Comment
All comments are checked. Comment SPAM will be blocked and deleted.