Running the Amazon Web Services Sample Application In Eclipse
The NetBeans site has published an article on running the Amazon Web Services Sample with NetBeans 4.1. I thought I'd pull the sample down and run it in Eclipse, just to see what would happen. Turns out that Eclipse runs it just as well if not better. Of course, Your Mileage May Vary, but at least it was fun running it under Eclipse.
Setup
The Amazon Web Services Sample requires that you register as an Amazon Web Services Developer before you can download and use it. Registration is free. Once installed and built the sample application will make web service requests to Amazon. Each Amazon web services request requires a subscription ID parameter, which you'll receive via your email address after registering.
If you don't have Java installed, pick it up from your favorite Java download site. Make sure you at least have Java 1.4.2 installed. The Amazon sample application runs against 1.4.2_08. I had 1.5.0_04 installed on my notebook, so I had to download and install 1.4.2 side-by-side with Java 5. If you don't have Eclipse then download Eclipse 3.1 from the projects download page and install it.
If you're installing Java 1.4 onto a pre-existing Eclipse setup with another JVM other than 1.4.2, you need to tell Eclipse about the new JVM. Go to Preferences (Window | Preferences) and hit the Add button if the 1.4 JRE is not already known by Eclipse.
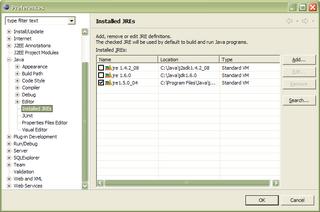
As you can see I've already added the JREs for Java 1.4 and Java 6, while Java 5 is my default JRE.
With that out of the way, we'll now start the Amazon Sample step by step like NetBeans.
Create the Eclipse Project
The Amazon web services include a Help operation, which returns information on how to execute the other operations. We're going to follow the instructions exactly as posted on the Netbeans site.
Note to the reader: If you have read and tried to run the NetBeans article at this point, you may find as I did that pressing F7 puts starts the application in Debug mode.
It would be nice if you didn't have to paste in your Amazon subscription ID every time you wanted to run a different operation. Let's fix that:
One of the real advantages to running the sample application from Eclipse is the ability to debug it.
Setup
The Amazon Web Services Sample requires that you register as an Amazon Web Services Developer before you can download and use it. Registration is free. Once installed and built the sample application will make web service requests to Amazon. Each Amazon web services request requires a subscription ID parameter, which you'll receive via your email address after registering.
If you don't have Java installed, pick it up from your favorite Java download site. Make sure you at least have Java 1.4.2 installed. The Amazon sample application runs against 1.4.2_08. I had 1.5.0_04 installed on my notebook, so I had to download and install 1.4.2 side-by-side with Java 5. If you don't have Eclipse then download Eclipse 3.1 from the projects download page and install it.
If you're installing Java 1.4 onto a pre-existing Eclipse setup with another JVM other than 1.4.2, you need to tell Eclipse about the new JVM. Go to Preferences (Window | Preferences) and hit the Add button if the 1.4 JRE is not already known by Eclipse.

As you can see I've already added the JREs for Java 1.4 and Java 6, while Java 5 is my default JRE.
With that out of the way, we'll now start the Amazon Sample step by step like NetBeans.
Create the Eclipse Project
- Start your Eclipse.
- Right-mouse-click New | Project... in the Package Explorer.
- Select Java Project then Next.
- Type in 'AmazonProject' for the project name and click Next.
- On the Libraries tab, make sure you're using JRE 1.4. If you're not, select the JRE system library line and click Edit. In the JRE System Library dialog, click the Alternate JRE radio button. This will enable the alternate JRE dropdown. Select the 1.4.2 JRE and click Finish. If you don't see the JRE, you can add it by clicking the Installed JREs button and adding it as outlined at the start of this post. When you've selected JRE 1.4.2 click Finish.
- Import the sources. Right mouse click AmazonSample on the Package Explorer and select Import.
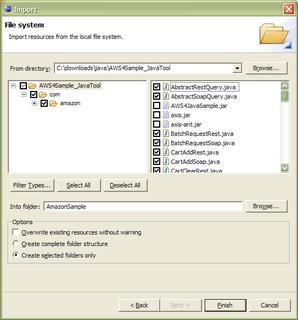
- On the Import dialog select File system. Click Next.
- Browse for the location where you unzipped the Amazon sample files. In my case it was under C:\downloads\java\AWS4Sample_JavaTool.
- Select the top level directory (AWS4Sample_javaTool), then on the right unselect the items you don't want imported into the source area. I unselected the jar files that are in the root distribution. Click Finish.
- Expand the AmazonSample project in the Package Explorer. Right mouse click on the AmazonSample root folder and open the Properties dialog.
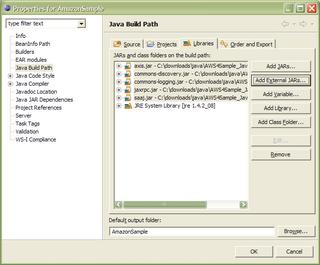
- Select the Java Build Path entry. Click on Add External Jars. Navigate to the AWS4Sample_JavaTool folder and pick up axis.jar, commons-discovery.jar, commons-logging.jar, jaxrpc.jar, and saaj.jar. Click open. You can select all of the jar files in one operation simply by using [Ctrl] left mouse button click to select just the files you need. Then click OK on the Properties dialog.
- You're now ready to build and run the project.
- There are a number of ways to build the project under Eclipse. For now select Project | Build Automatically on the main menu.
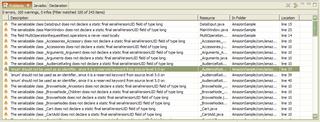
- After Eclipse is finished you should check the Problems pane. The Problems pane is usually at the bottom of the IDE, beneath the editor panes. Because of how my configuration is set up, the Amazon sources generated a large number of warnings. You can finely tune the generation of warnings from the Properties | Java Compiler dialog section. Some warnings I consider annoying, such as the ones about not declaring a static final serialVersionUID field. Others I pay attention to, such as the use of 'enum' as an identifier. Enum is a keyword in Java 5, and I use those warnings to clean up code destined for movement from prior versions of Java 5 to Java 5 and beyond. It's your call at this point, and I leave it as an exercise to the reader to explore this portion of the IDE. But the warnings will not stop the application from running. At this point, the application is ready to run.
- From the main menu select Run | Run. This will pull up the Run dialog that allows you to create, manage, and run configurations. At the top of the dialog box type in 'AmazonSample' for Name.
- You need to tell Eclipse where main() is. On the Run dialog click the Search button in the Main class sub-panel to select your main class, or simply type in 'Main' (without the quotes) in the text field. Click the Run button at the bottom.
- The application will start and a Console pane will appear in the same area as the Problems pane, overlaying the problems pane. It should have just one line in it: "Starting Application..."
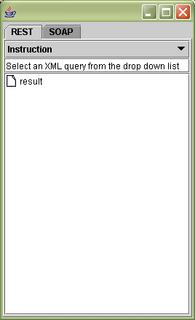
The Amazon web services include a Help operation, which returns information on how to execute the other operations. We're going to follow the instructions exactly as posted on the Netbeans site.
- Select the SOAP tab on the application.
- Select Help from the dropdown.
- Enter your Amazon subscription ID.
- Enter ItemSearch in the About text field.
- Enter Operation in the HelpType text field.
- Click the Send button. Unfortunately, the response I got was not the same as the response on the NetBeans page. Just to make sure there was nothing out of the ordinary, I created the project under NetBeans 4.1 and got the exact same response.

It was at this point I said "hmmm...." but decided to continue playing with the application. I need to go back to the Amazon web site and find out what is really happening here. Anyway, continuing with the demonstration... - Select ItemSearch from the dropdown menu.
- Enter your subscription ID.
- Enter an interesting author, such as Terry Pratchett.
- Scroll down and enter ResponseGroup Medium.
- Enter SearchIndex Books.
- Scroll back up and click the Send button.

Note to the reader: If you have read and tried to run the NetBeans article at this point, you may find as I did that pressing F7 puts starts the application in Debug mode.
It would be nice if you didn't have to paste in your Amazon subscription ID every time you wanted to run a different operation. Let's fix that:
- Open DataInput.java. If you're running with emacs key bindings you can search for createGUI using [Ctrl] S, or you can look at the class in the Outline pane and click on the class function there. If you use [Ctrl] S you'll have to hit it a few times to move down the source file. If you use the Outline pane you can single click on it and go to it immediately in source. Regardless of the method used you should now be at the createGUI class function.
- Insert the code in blue between the two existing lines of code:
commonTextFields[i] = new JTextField();
if (commonParameterNames[i].equals("SubscriptionId")) {
commonTextFields[i].setText("your_subscription_id");
}
container = new Container(); - Save your changes. The file will be automatically rebuilt. To re-run the application again, press [Ctrol] F11 or click the round green run button on the tool bar.
I'm not going to attempt to show how to use a proxy. I'm doing this behind a firewall that doesn't require a proxy.
One of the real advantages to running the sample application from Eclipse is the ability to debug it.
- Open DataInput.java if it isn't already opened. Navigate back to the createGUI class function using [Ctrl] S or the Outline pane. Using the mouse, double click in the left margin to create a break point on the variable commonTextFields.

- Press F11 to run the sample application in debug mode. This should put the IDE in Debug View. I've used my IDE for a while now, but if this is the first time you've run the IDE in debug mode you will be asked if you want to switch to debug view, and to make the selection automatic in the future. Note that when you finish debug mode that the IDE will switch back to Java edit view.

- In Debug view one of the panes opened is the Variables pane in the upper right. The variable you placed the breakpoint in is centered in the Variables pane and is highlighted. From this point you can examine commonTextFields, or continue debugging the application with F5 (Step Into), F6 (Step Over), or F7 (Step Return). Experiment and have fun!

Comments
Post a Comment
All comments are checked. Comment SPAM will be blocked and deleted.